Backpack Paria Canyon
37° 04' 48.5" N 111° 53 '25.8" W
Route Type: Point-to-Point
Distance: 38 miles
Trailhead: White House Trailhead, Kanab UT
Permits Required: Yes
Recommended Duration: 4 days/3 nights
Post-Hike Beer: Uinta Hop Nosh Tangerine IPA
The Hike:
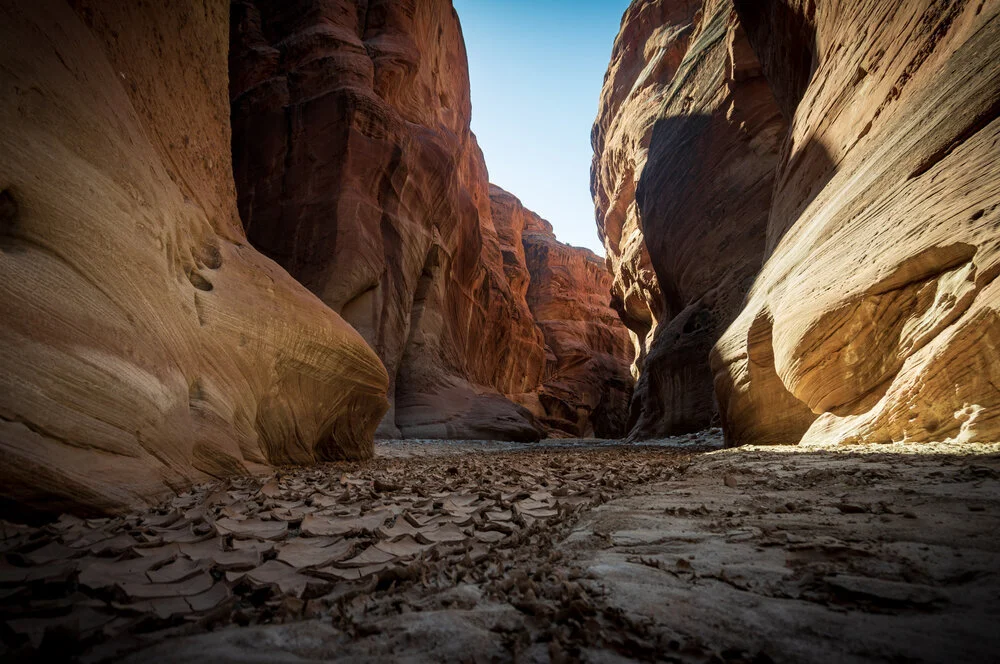
Trekking through Paria Canyon requires a 38 mile point-to-point journey through winding canyons carved by the Paria River over thousands of years. There are no marked trails during the route, instead you simply follow the river from the Whitehouse Trailhead (off Highway 89, midway between Page, AZ and Kanab, UT) to Lee’s Ferry near the confluence with the Colorado River.
Logistics:
The BLM sets the limit for overnight backpacking to 20 people per day entering through an online permit process administered by Recreation.gov. Permits are required and you must indicate the number of days that you will be staying in the canyon and pay the appropriate fees ($9.00 reservation fee + $5.00/day). Permits are available starting at 12:00 PM (MST) on the first of the month, three months prior to when you will be completing the hike. For instance, permits would be available for September start dates (9/01-09/31) on June 1st. The permit fees for a 4 day/3 night trip are as follows:
1 Person: ($20 + $9.00 reservation fee) = $29 total
2 People: ($40 + $9.00 reservation fee) = $49 total
Expect the permits to sell out fast during popular times (i.e., the cooler months to avoid the brutal summer heat). Permits can be picked up in Kanab or St. George, Utah, or seasonally at the Paria Contact Station (the guard station just after turning off Highway 89).

This is a point-to-point hike requiring a 1.5 hour drive from the exit at Lee’s Ferry back to the trailhead at Whitehouse, and thus it is necessary to have 2 cars or to arrange a shuttle to the trailhead after dropping a car off at the exit.
There is small drive-up campground at the trailhead ($5/night) and it is recommended to camp here the night before starting your hike so that you can get an early start. In addition to being convenient for starting the hike, the campsites provide a nice intro the desert scenery that you will be hiking through for the next 3-4 days.
Breakdown
Day 0
With this hike being a point-to-point route, it is necessary to leave a car at the end of the trail at Lee’s Ferry. Before dropping your car off at Lee’s Ferry, pick up your permits at the Paria Contact Station (or in Kanab/St. George, UT) in order to receive a pass to display in your car at Lee’s Ferry indicating your completion date. If you plan on staying at the Whitehouse Campground, it is a good idea to go ahead and set up your tent and pay the $5 camping fee to stake your claim before dropping your car off at Lee’s Ferry. If you don’t have two vehicles, it is possible to arrange a shuttle to take you from Lee’s Ferry to the Whitehouse Trailhead. If using a shuttle service it is essential to make sure that you have EVERYTHING you need for your trip before being dropped off. Once you arrive at the Whitehouse Campground, set up camp and enjoy a relaxing evening in the desert. Note, there is not much to do at the Whitehouse Campground so it is recommended to arrive at the campground fairly late in the day to avoid sitting around in the sun for hours.
Day 1 (12.2 miles)
Wake up early and tear down your campsite at the Whitehouse Campground to begin your trip through Paria Canyon. Follow the well worn path down to the riverbed and simply continue on following the river as the canyon steadily becomes deeper and more narrow throughout the day. After ~7 miles of hiking you will come to the confluence with Buckskin Gulch where you will continue on following the river bed (Do not make a hard right turn and mistakenly head up Buckskin Gulch). Continue hiking for another 2.5 miles until you reach a large campsite with a foliage covered ‘arch’ on the right side of the river. This formation is what is known as a ‘seep’ and should not be mistaken for Big Spring although the water is perfectly safe to collect and filter for drinking. This site makes for a good campsite if you are feeling worn out for the day, however, it is recommended to continue on for another 2.5 miles to reach Big Spring to reduce the distance covered on the second day as it is much more difficult hiking on the second day.

Day 2 (9.8 miles)
Before starting your journey on the second day, drink plenty of water with your breakfast and then make sure that all of your bottles, bladders, etc. are completely filled with filtered water from Big Spring. Day 2 will take you 9.8 miles to the campsite at Shower Spring. The combination of widening canyon walls (and therefore more direct desert sun) and more water crossings containing soft sand river beds makes Day 2 arguably the most difficult day of hiking. There are not many landmarks to gauge your progress through this section and the winding canyon begins to look very similar around every bend. This section of the hike also presents one of the other hazards of this backpacking route: rattlesnakes.
As the canyon begins to widen, more foliage/cover is able to take hold and provides prime snake habitat. On our hike we counted 5+ different rattlesnakes (we never saw a snake but we heard their rattles from the river). It is important to keep in mind that rattlesnakes will see/hear you before you see/hear them and therefore they will typically begin rattling as a warning well in advance. Never approach an area where a rattle is coming from and be mindful if you are walking through brush or scrambling over rocks. Always step on top of obstacles rather than stepping directly over them. In general, if you stick to the river you will have no issues with snakes.
Your first indicator that you are approaching your campsite is Wrather Canyon which will be on your right as you follow the river (we never noticed Wrather Canyon so it may be hard to spot). Shower Spring is pretty difficult to find and can be easily missed. It is hidden on the left bank of the river behind some tall bamboo like plants directly across from a large campsite. There may or may not be a cairn/arrow pointing in the direction of the spring. The campsite is located at the end of a long straight stretch of the river on a large sand bank with a couple of large trees. We were able to get a weak GPS signal on our phones (google maps) to confirm that we were in the correct location. Be careful with this campsite as there are a lot of mice. To reach shower bring, follow the entrance up the muddy bank through the bamboo and simply follow the short path until you reach water. You will have to wade through waist deep water to reach the back of the spring where the source is flowing from the rocks.

Day 3/Day 4 (16 miles)
On day three, fill up all of your water containers and set out towards Last Reliable Spring (3 miles). Last Reliable Spring is located on the left side of a rocky portion of the river behind some large boulders and is easily missed. Look for a small trickle of water running towards the river across from a large campsite. At Last Reliable Spring it is recommended to drink a decent amount of water and/or cook a dehydrated meal in order to maximize your water reserves before heading out. Continue on for (~5 miles) until you reach the last established campsite near a large tree on the right side of the river. It is possible to continue on and complete the hike in only 3 days but this requires a substantial amount of effort on the third day (16 miles). It is recommended to finish the hike after spending the night at the last established campsite. Near the end of the hike you will reach the Wilson Ranch, indicating that you are nearing the end of your journey. The Lonely Dell Ranch is the last landmark and is adjacent to the parking area.

Best Time to Go:
The best time for hiking Paria Canyon is during the cooler months as summer brings the potential for heavy rains (and flash flooding) and higher temperatures. Always check the weather reports before starting the hike as flash flooding can be very dangerous, particularly in the Narrows section in the earlier part of the hike.
Good to Know:
Water
You cannot drink water from the aptly named Paria River (Paria is the Paiute Indian word for ‘Muddy Water”) as it is too silty and will damage your water filter. In addition, the BLM warns that the water may contain viruses from livestock upstream. There are 3 reliable springs located through the canyon:
Big Spring, mile 12 (Easily seen on the right side of the canyon, across from a large campsite)
Shower Spring, mile 22 (Easy to MISS. Hidden behind tall plants on the opposite side of the river from a large campsite)
Last Reliable Spring, mile 25 (Easy to MISS. Hidden behind large boulders on the left side the river. Look for small trickle of water flowing across the rocks towards the river’s edge)
In addition to the springs, there are small seeps coming from the canyon walls which can be easily spotted by looking for lush green foliage growing from the canyon walls. It is recommended to fill up water every time you come across a viable source.
I set out every morning with nearly 5 Liters of water in my pack and near the end of days 2 and 3 (following the 3 day/2 night itinerary) I was running low on water. Carrying that amount of water will add significant weight to your pack (> 10lbs) but it is worth the extra weight to ensure you have plenty of water, especially with 2 of the springs being somewhat difficult to find. If a spring is missed and you are running low on water, it is possible to drink the river water as a last result although the amount of silt can damage your filter easily. With that in mind consider using a gravity bag style water filter. If you have to filter water from a silty source, you can allow the silt to settle at the bottom before filtering your water in order to avoid damage. It is also recommended to have water stored in your car at the exit of the trail as well, since there are not any stores nearby the exit.
Campsites
There are no designated campsites throughout the hike, however there are established campsites that you are expected to use to reduce the environmental impact. These sites are fairly obvious as they are on elevated sandy benches and are typically the only suitable place for camping in the area. Beware of mice at ‘Severely Impacted’ campsites (hang backpack/food from tree and do not leave empty food wrappers in your tent or backpack as they will chew through to get to them).
Hazards
Rattlesnakes are common on this route, particularly during the middle sections of the hike following the Narrows. Take precautions when scrambling over boulders/logs. You will typically hear a rattlesnake well before seeing one. Do not go looking for them and avoid the area from where the sound is originating.
Since the hike follows a river prone to flash flooding, quicksand commonly occurs throughout the hike. Typically it is nothing more than a minor annoyance of sinking a few inches and fighting to keep your boot from being sucked off your foot.